Quick-start guide

Your first race with Smartiming

Organizing a race and new to Smartiming? This guide takes you step by step from creating your account to publishing the results. It only covers the essentials: you will discover the rest as you go. The screenshots show the app in French; in English, the same buttons sit in the same places.

Key words

Event
Your race day, for example “Lakeside Run 2026”. It groups one or more races.
Race
One race of the event, for example “10 km” or “Half marathon”. Each has its own participants and its own clock.
Participant
A runner registered for a race.
Race status
Where the race stands: In preparation → Bib pickup → In progress → Finished. Changing the status moves the race forward.

Where to use Smartiming?

On a computer

In your browser, at app.smartiming.net. The most comfortable way to prepare the event.

On a smartphone

With the Smartiming app, from the App Store or the Play Store. Your race-day tool: bib pickup, start, finishes.

Before the race

Prepare your event

Step 1

Create your account

On smartiming.net, click “Create my free account”. Enter:

  • your last name and first name;
  • your organization's name, in capital letters, with hyphens if needed (for example LAKESIDE-RUNNERS);
  • your email address and a password.

You automatically become your organization's administrator. Confirm your address with the link sent to you by email, then sign in.

Remember: every sign-in asks for your organization's name, your email and your password. Write that name down.

Free credits come with your account. Each registered participant uses one credit, which you get back if you delete the participant before the start.
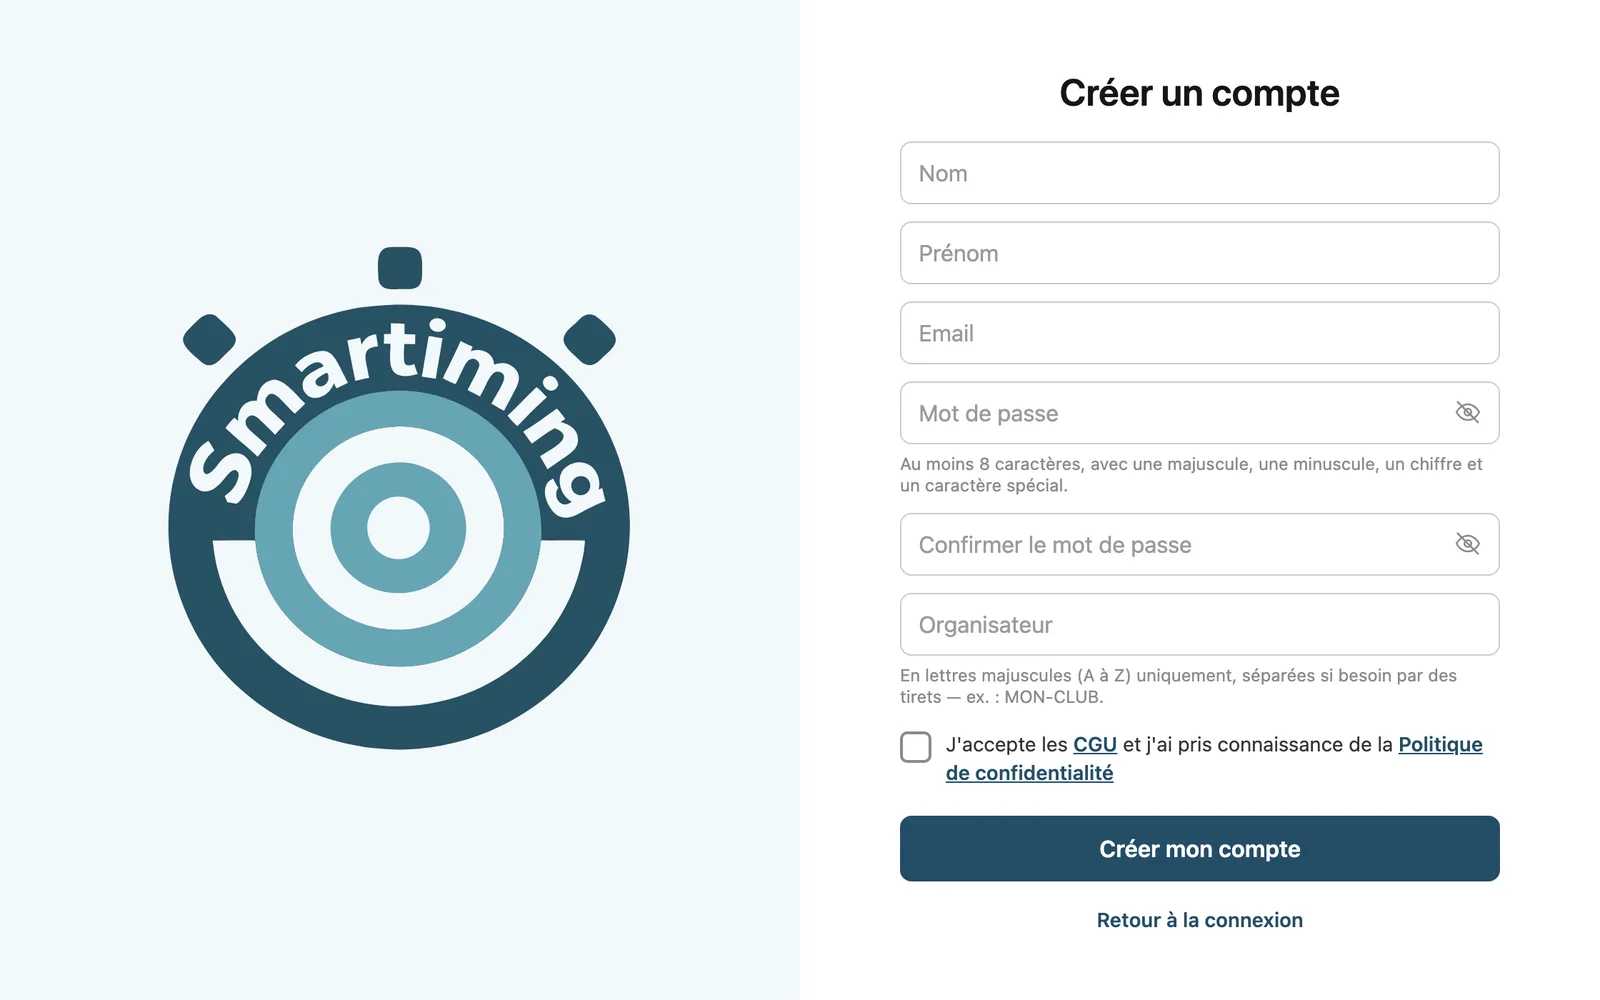
Smartiming sign-up form

Step 2

Create your event

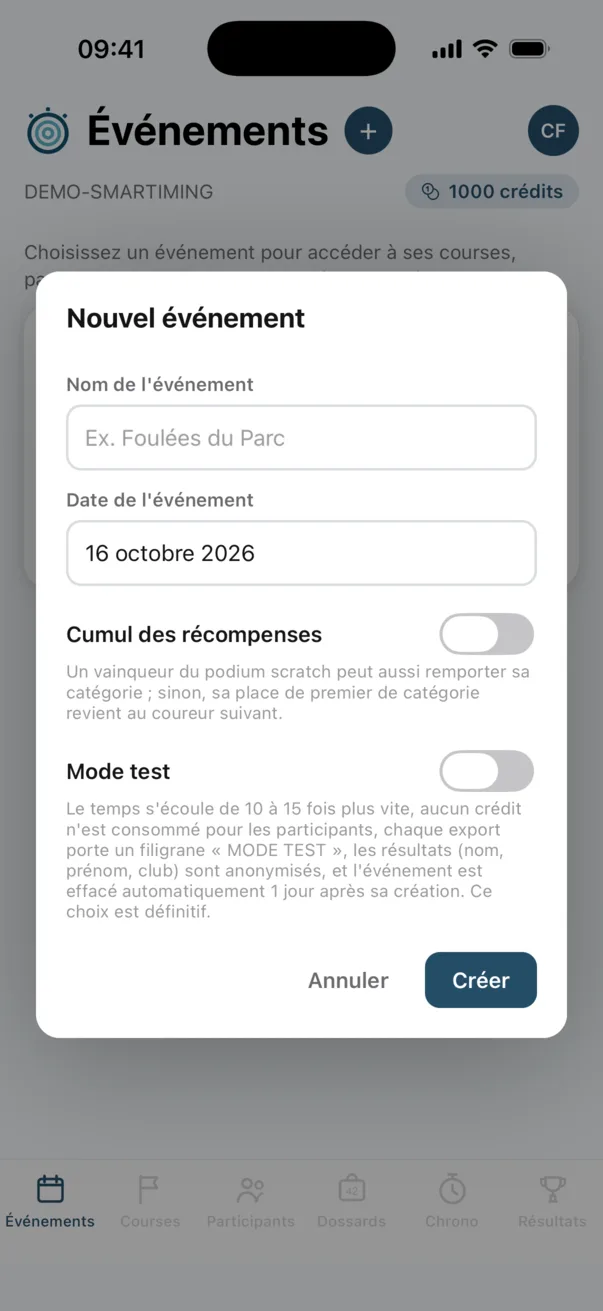
On the Events screen, tap “+”. Give your event a name and set its date.

Want to try first? Turn on Test mode when creating it. The event is then a sandbox: it uses no credits, race time runs faster and the event is deleted automatically after a day. Ideal for a rehearsal with your team.

Creating a new event in the Smartiming app

Step 3

Add your races

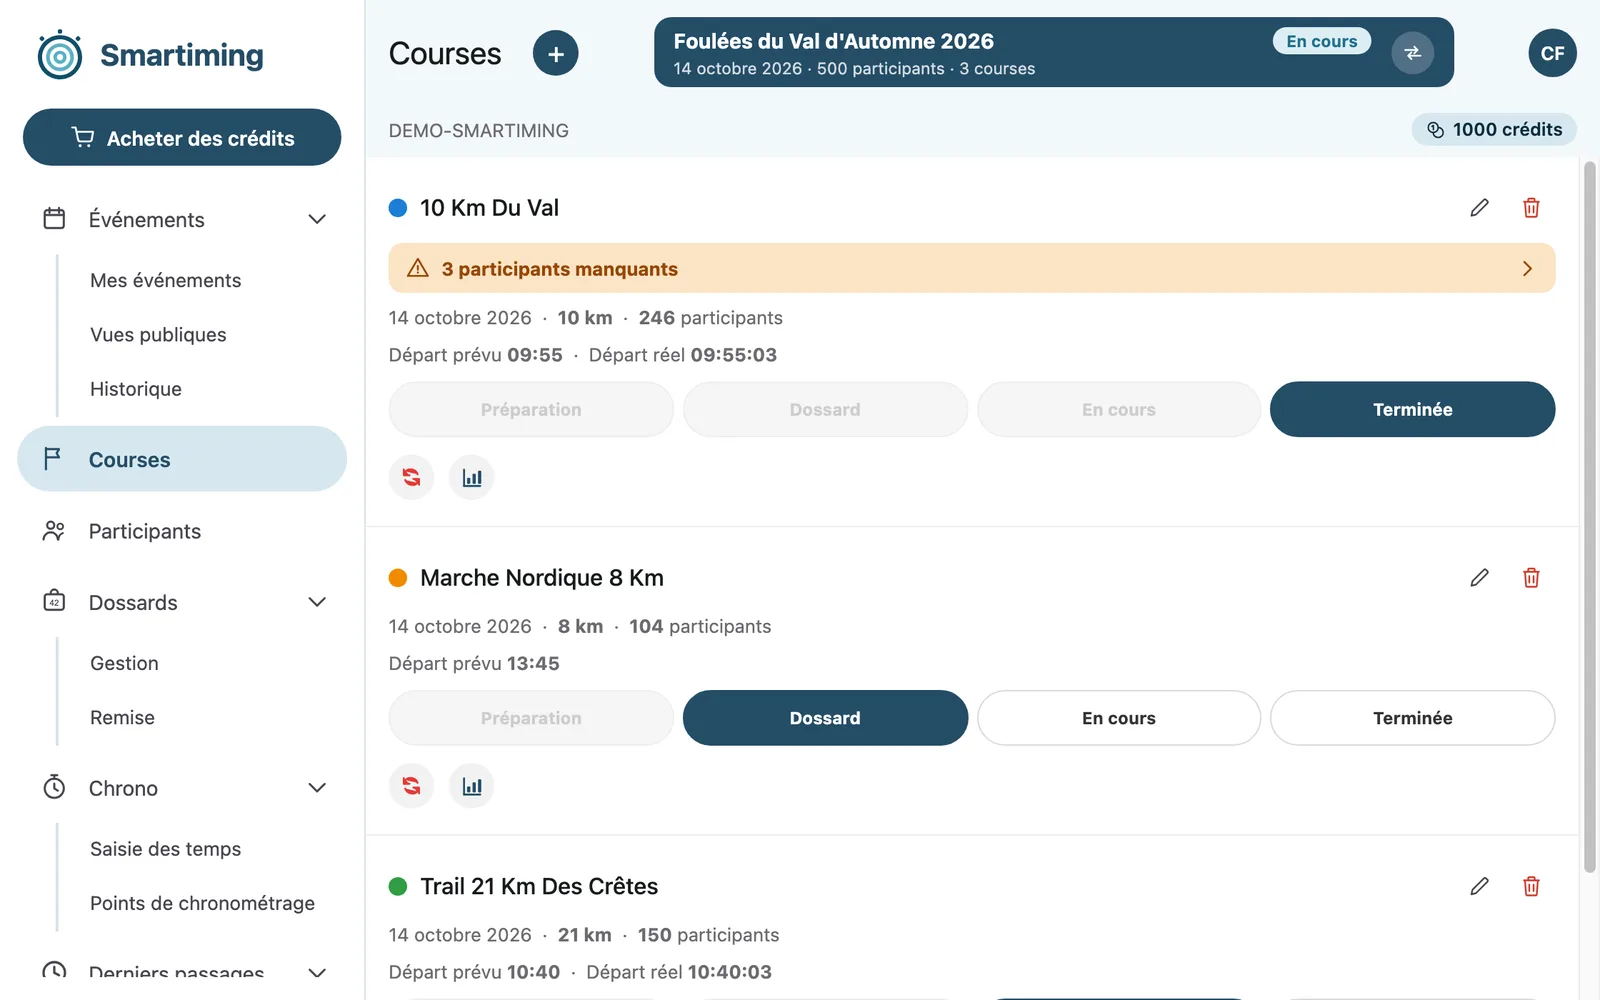
Open your event: you land on the Races tab. For each race, tap “+” and enter:

  • its name and distance;
  • its planned start time;
  • its color, used to recognize it everywhere in the app.
The races of an event in Smartiming

Step 4

Register your participants

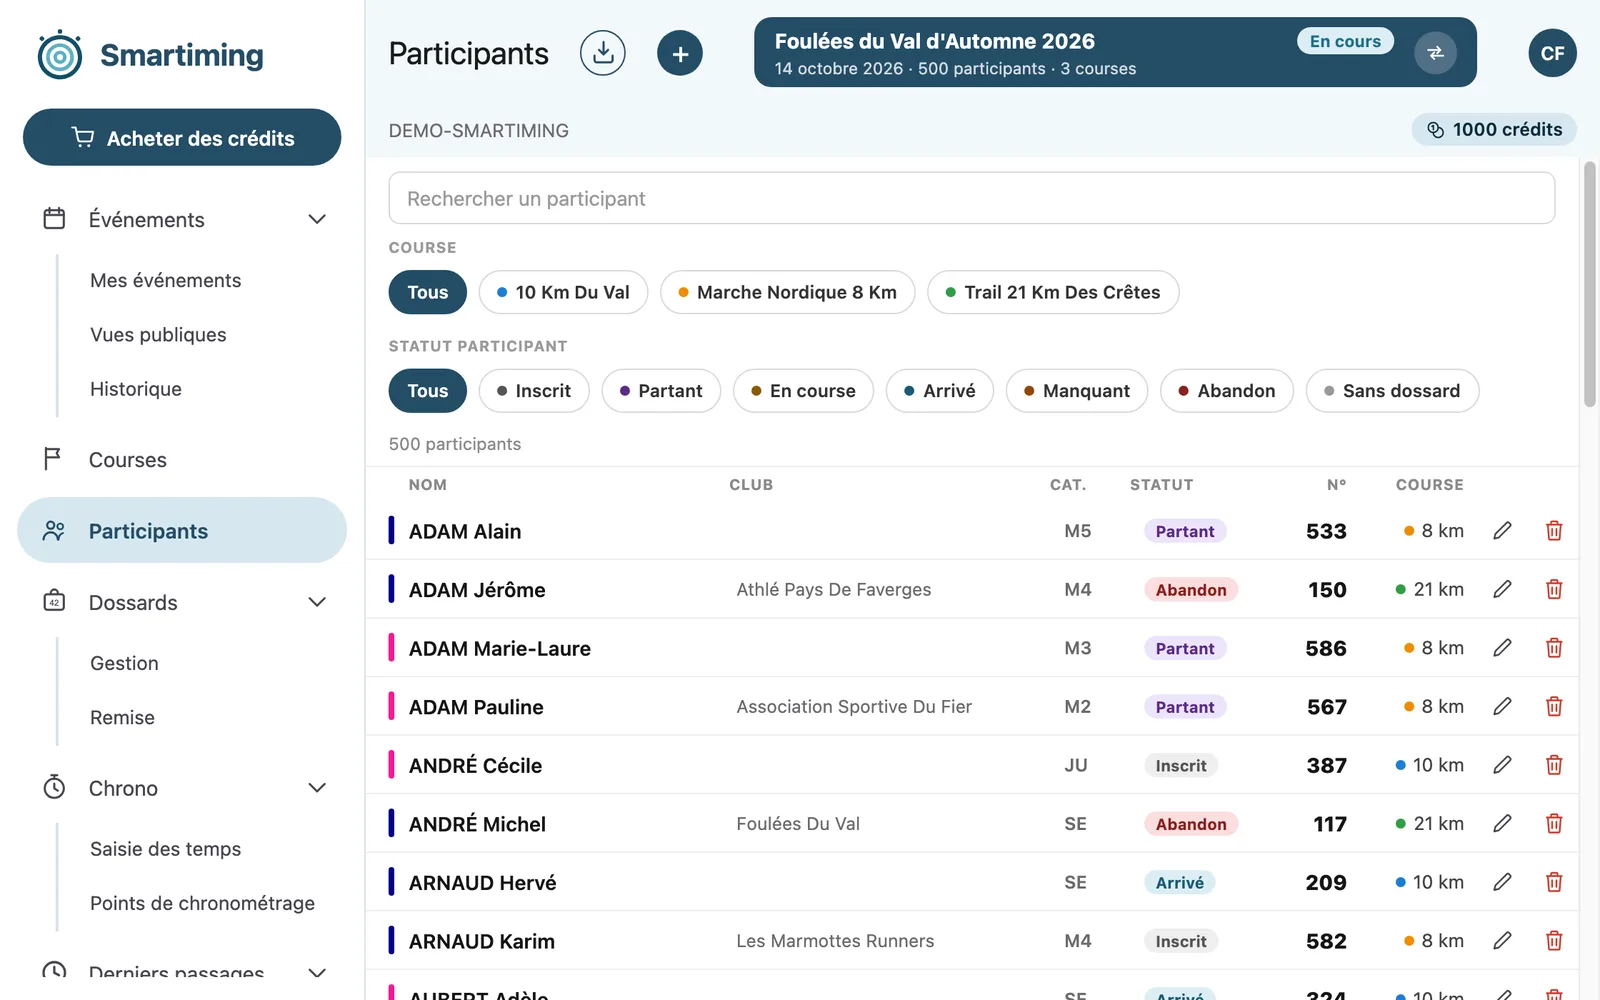
On the Participants tab, you have two options.

  • One at a time: tap “+” and enter the last name, first name, sex, then the date of birth or the category. With a date of birth, the category is worked out for you.
  • All at once, from an Excel file: tap the import button (the down arrow), pick the race and answer the questions. Smartiming then shows the expected format and offers a template file to download. Fill it in, import it, and a report lists the rows imported and those skipped.
The participants of an event in Smartiming

Step 5

Assign the bibs

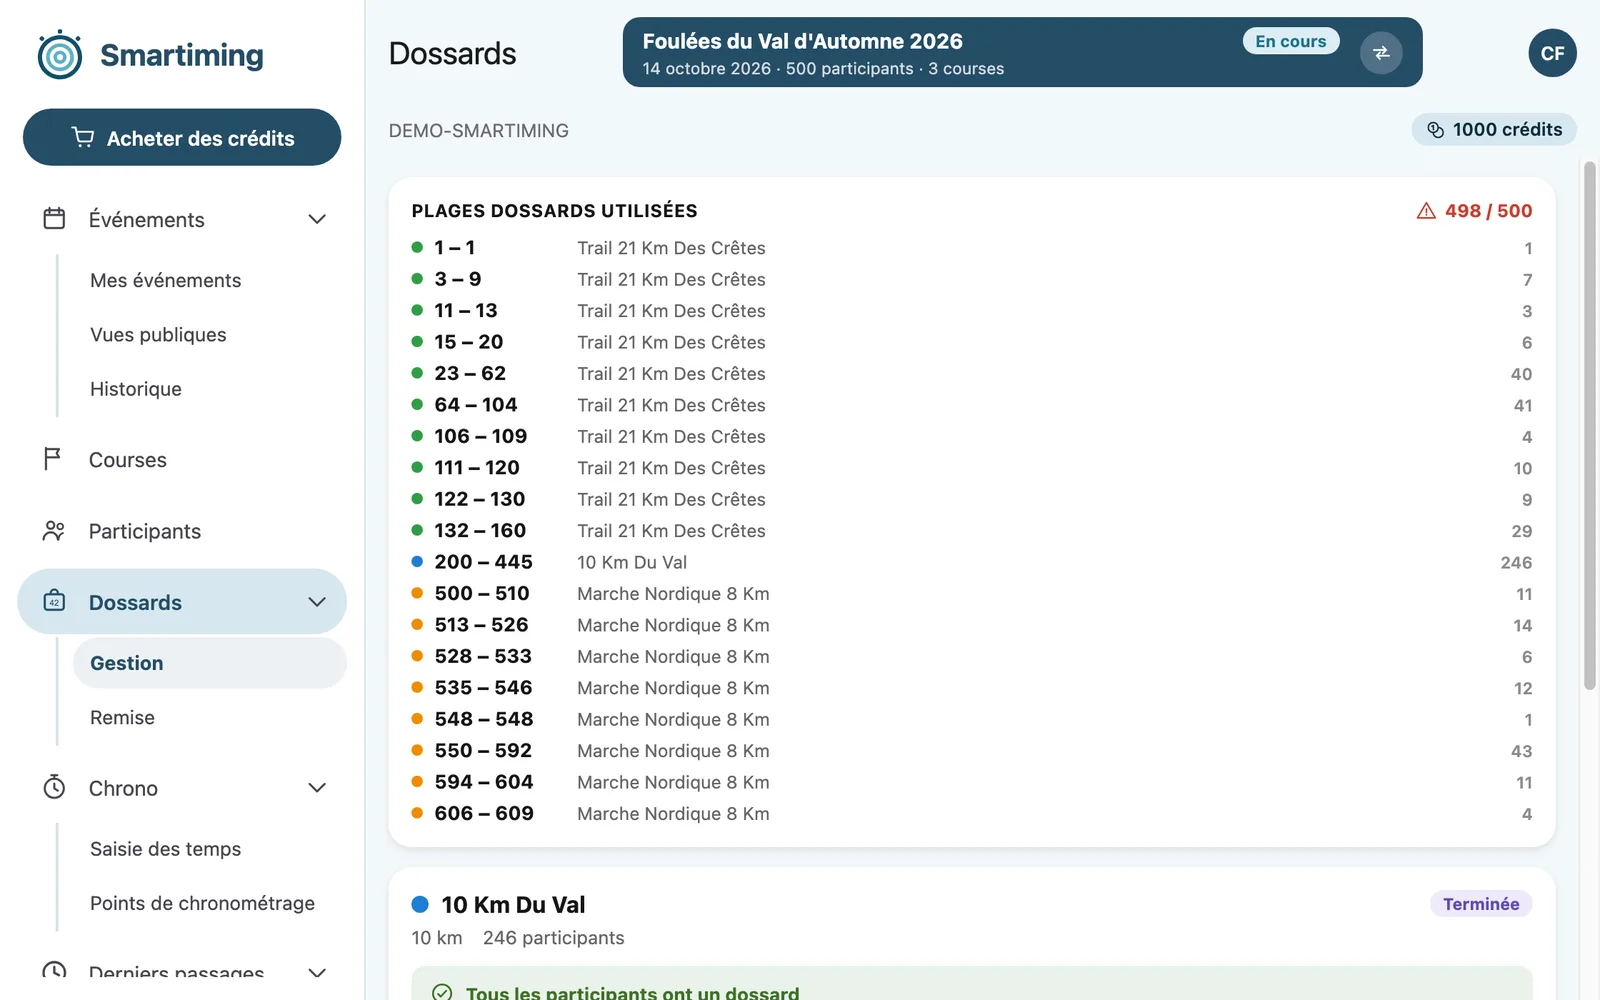
On the Bibs tab, choose “View and manage assignment”. For each race, tap “Assign” and enter a range of numbers, for example 1 to 300 for the 10 km.

Smartiming checks that the range covers every participant and doesn't overlap another race's. A bib number is unique across the whole event.

Several of you on race day? Add your volunteers from your profile menu, under Users. Give each a suitable role, for example Timekeeper or Bib handout: everyone only gets access to what they need.

Bib ranges assigned to each race in Smartiming

Race day

Run the race

Step 6

Optional

Hand out the bibs

If you hand out bibs some other way, go straight to the next step.

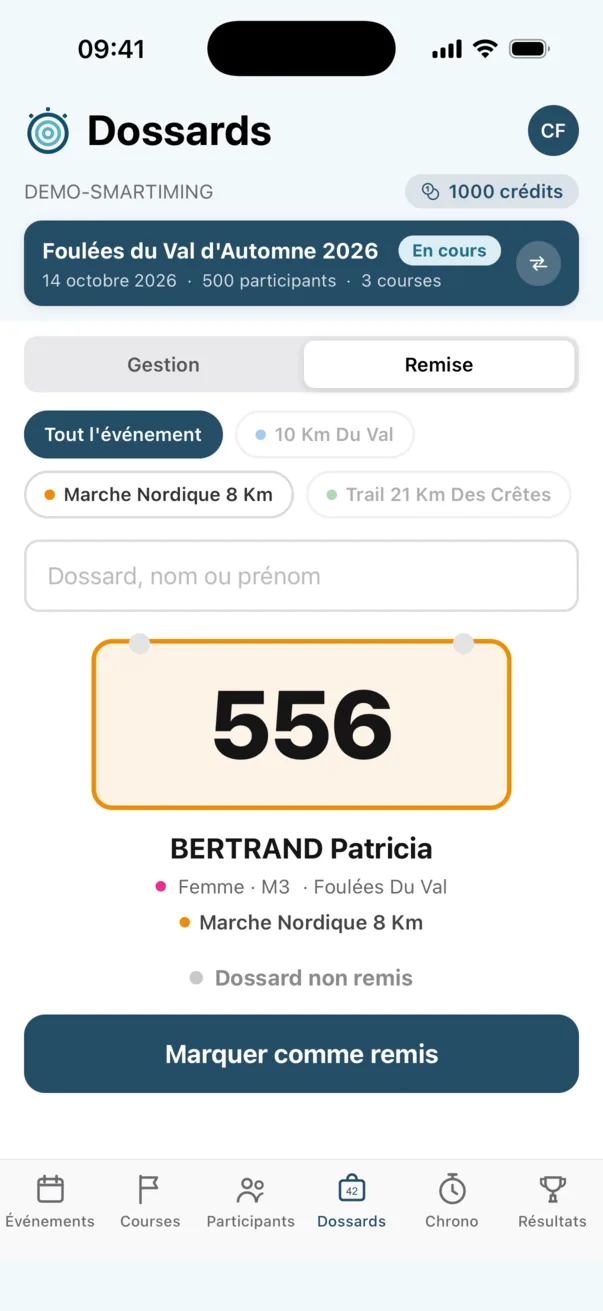
  1. On the Races tab, set the race to the “Bibs” status (bib pickup).
  2. On the Bibs tab, choose “Hand out bibs”.
  3. Search for the runner by last name, first name or number. Their bib shows up: hand it over and tap “Mark as handed out”.

A progress bar shows, race by race, how many bibs are still to hand out.

Handing a bib to a participant in the Smartiming app

Step 7

Start the race

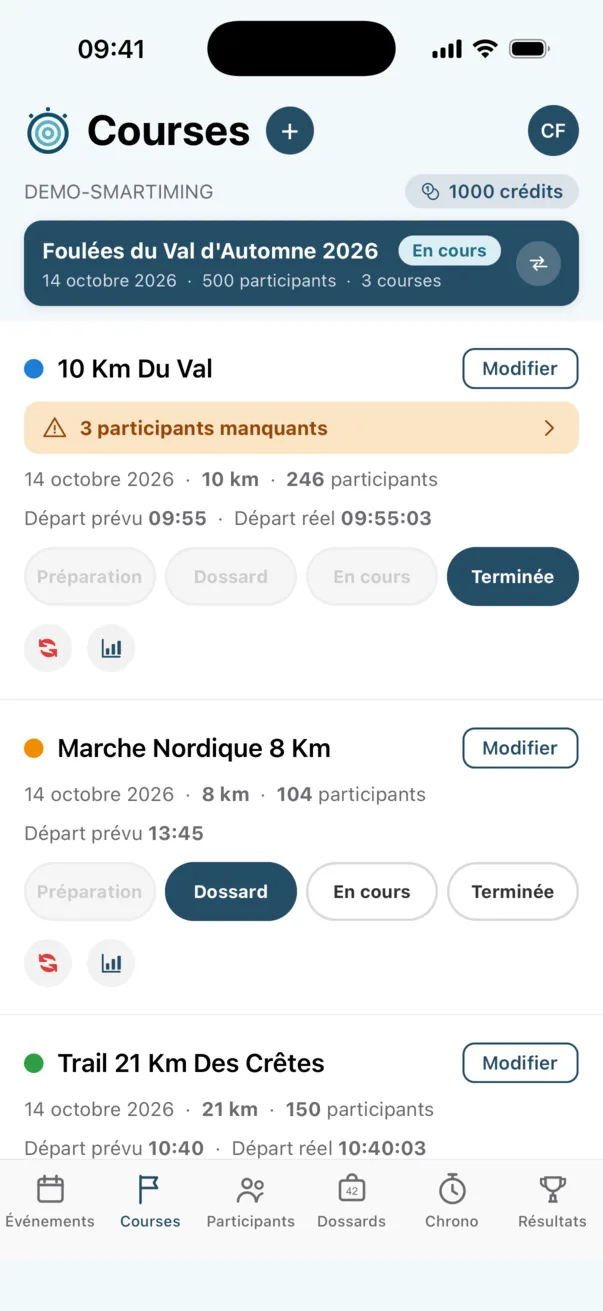
When the gun goes off, set the race to “In progress” on the Races tab. The race clock starts at that moment.

Tapped a little late? No worries. Tap “Edit” on the race and correct its actual start time: every time is recalculated.

Race statuses: finished, bib pickup, in progress

Step 8

Record the finishes

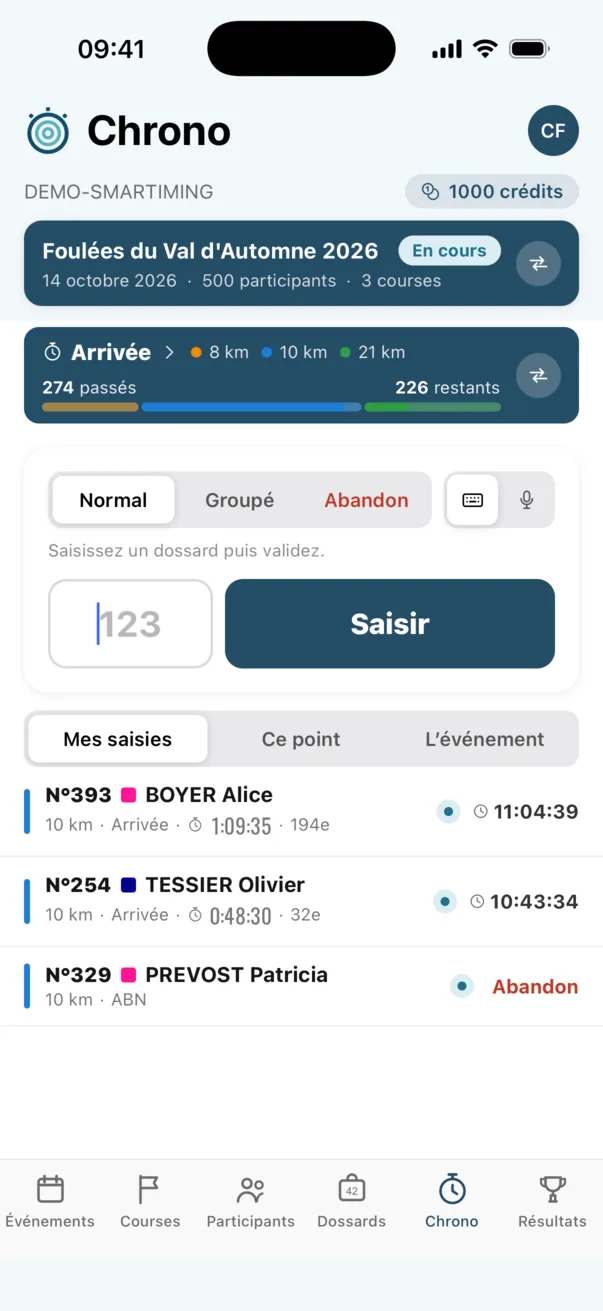
Open the Timing tab, then “Time entry”. If your event has several timing points, choose Finish; otherwise it is already selected. For each finisher:

  • type the bib number and confirm with “Enter”. The field clears at once, so you can keep going without waiting;
  • or say it: tap the microphone, then “Dictate a bib” for a single number, or “Continuous dictation” to keep the microphone on and call out the numbers as runners finish.

The crossing time is recorded the moment you enter it. A mistake can be fixed later in the crossing history, just below.

No network at the finish line? Keep entering. Finishes are kept on the phone and sent automatically as soon as the connection is back.

Tip: voice dictation downloads a module of about 40 MB the first time. Do it before race day, on Wi-Fi.

Entering finishes on the Smartiming Timing tab

Step 9

Close the race

Once the sweeper has crossed the finish line, set the race to “Finished”.

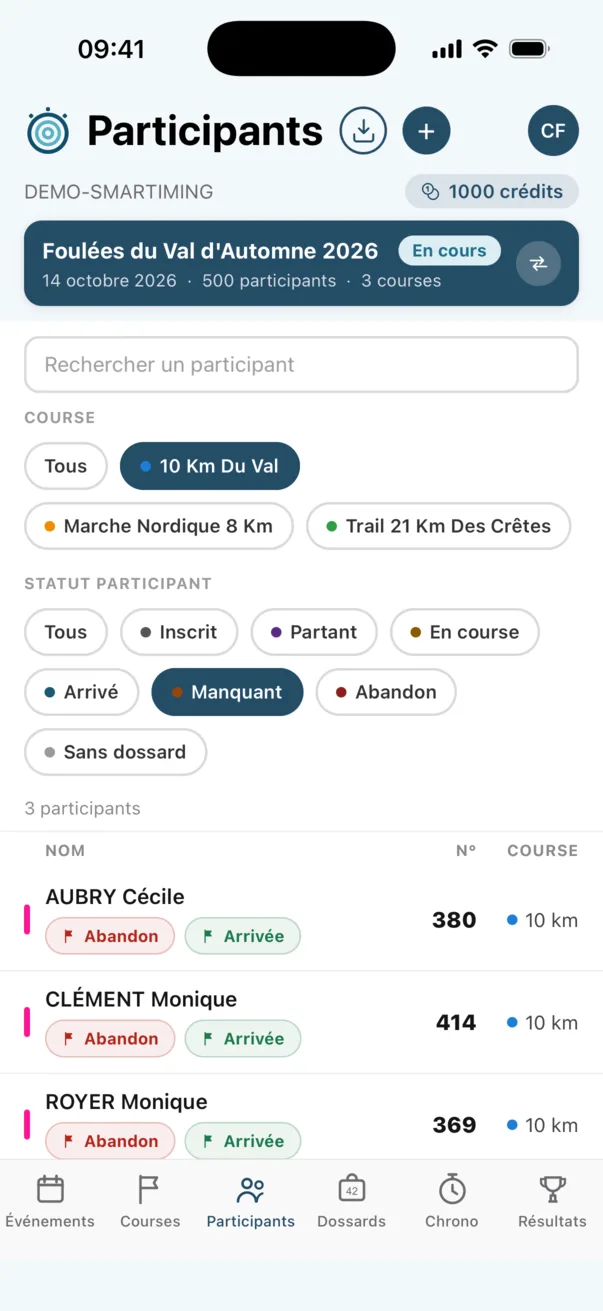
If some runners were never recorded at the finish, the race card shows “N missing participants”. Tap it to see the list, then choose for each one:

  • DNF if they didn't finish;
  • Finish if they did cross the line. You then enter their crossing time or race time.
Missing participants to declare as DNF or finished

After the race

Publish the results

Step 10

Check the results

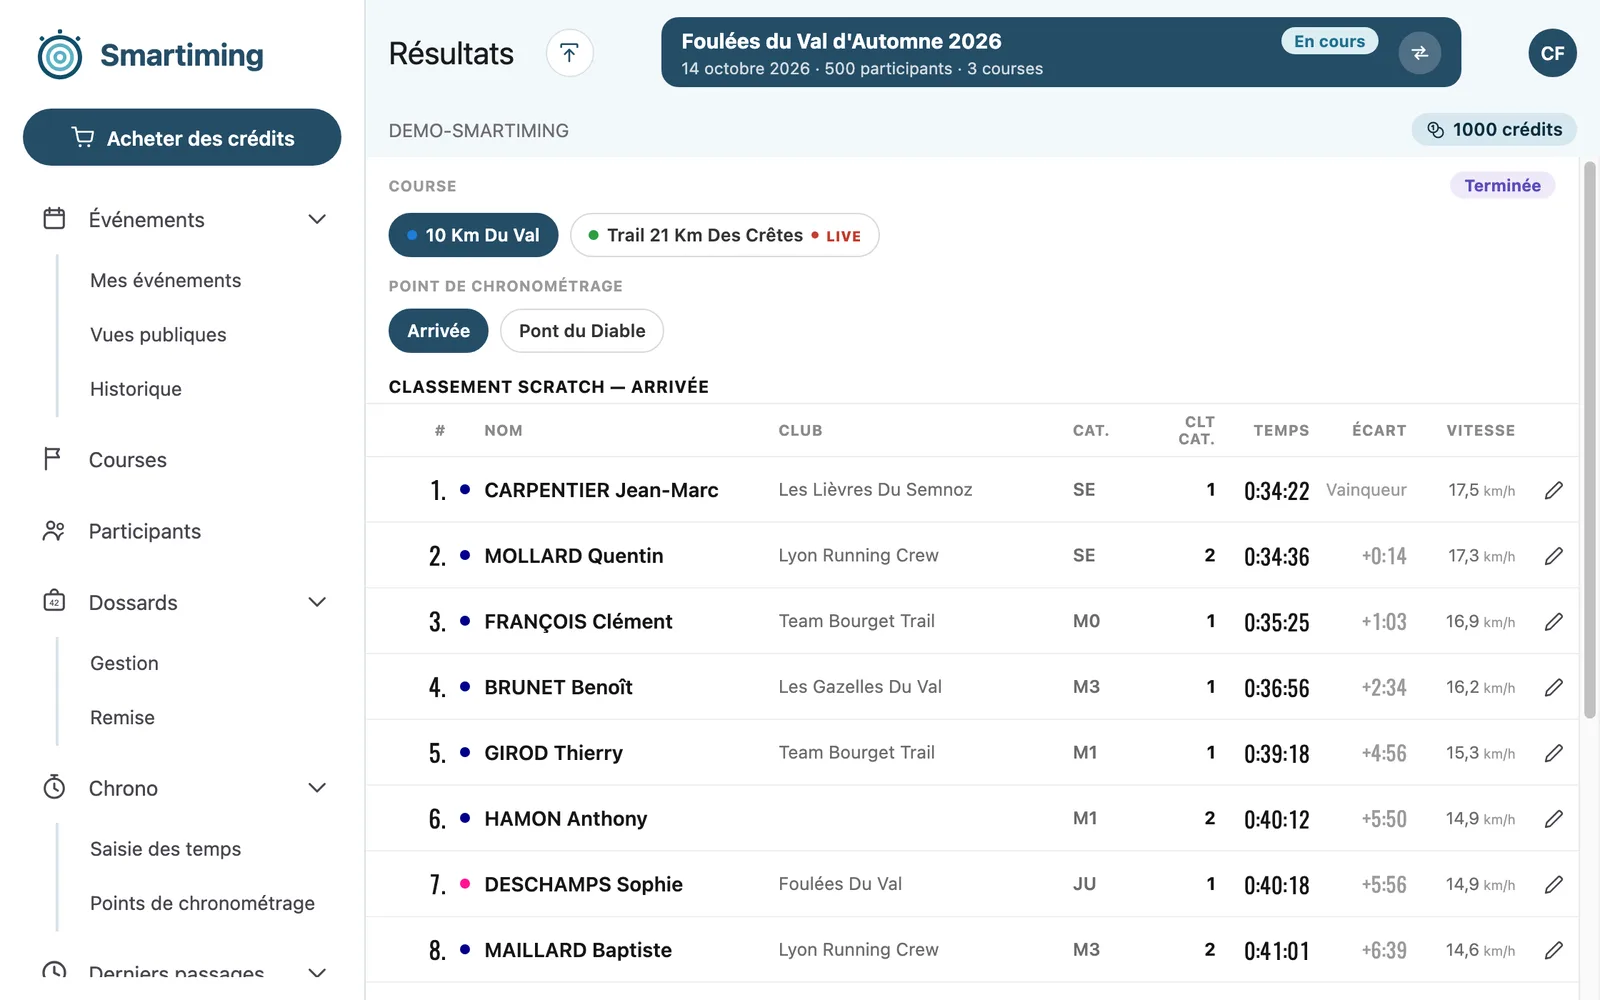
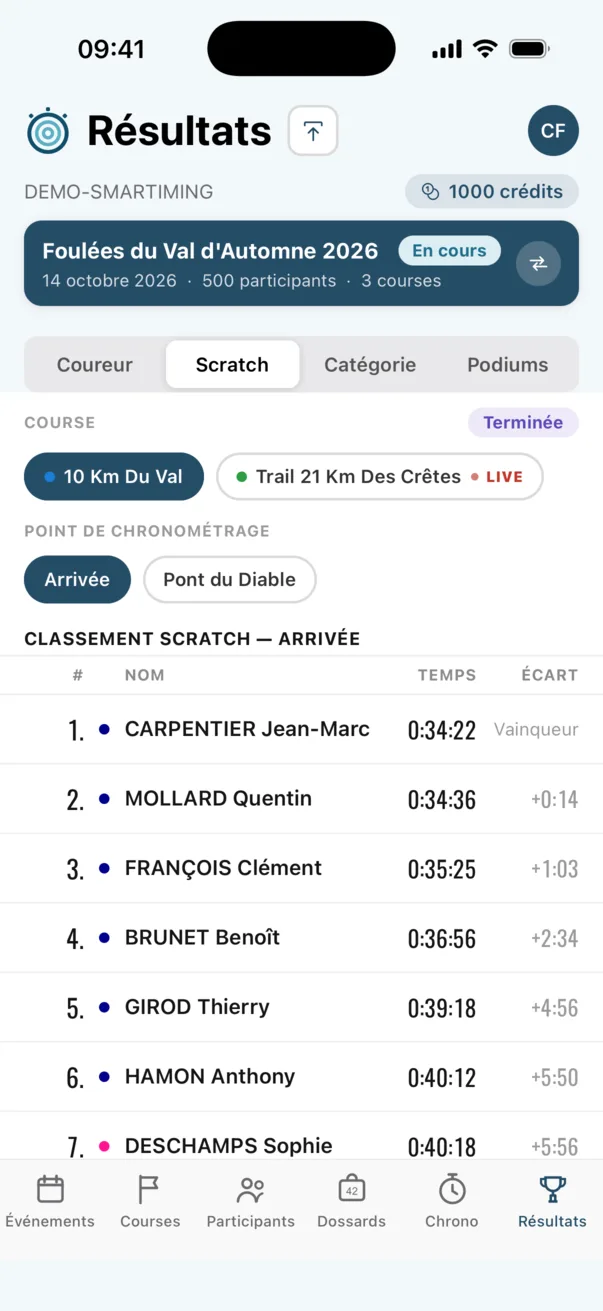
Results are available live, from the first finisher on, on the Results tab:

  • Runner: one participant's detailed result;
  • Scratch: the overall ranking;
  • Category: the rankings by category and sex;
  • Podiums: the awards to hand out, race by race.

The Export button (the up arrow) downloads the ranking as PDF, Excel or CSV.

Overall ranking of a race on a computer
Overall ranking of a race on an iPhone

Step 11

Share them with the runners

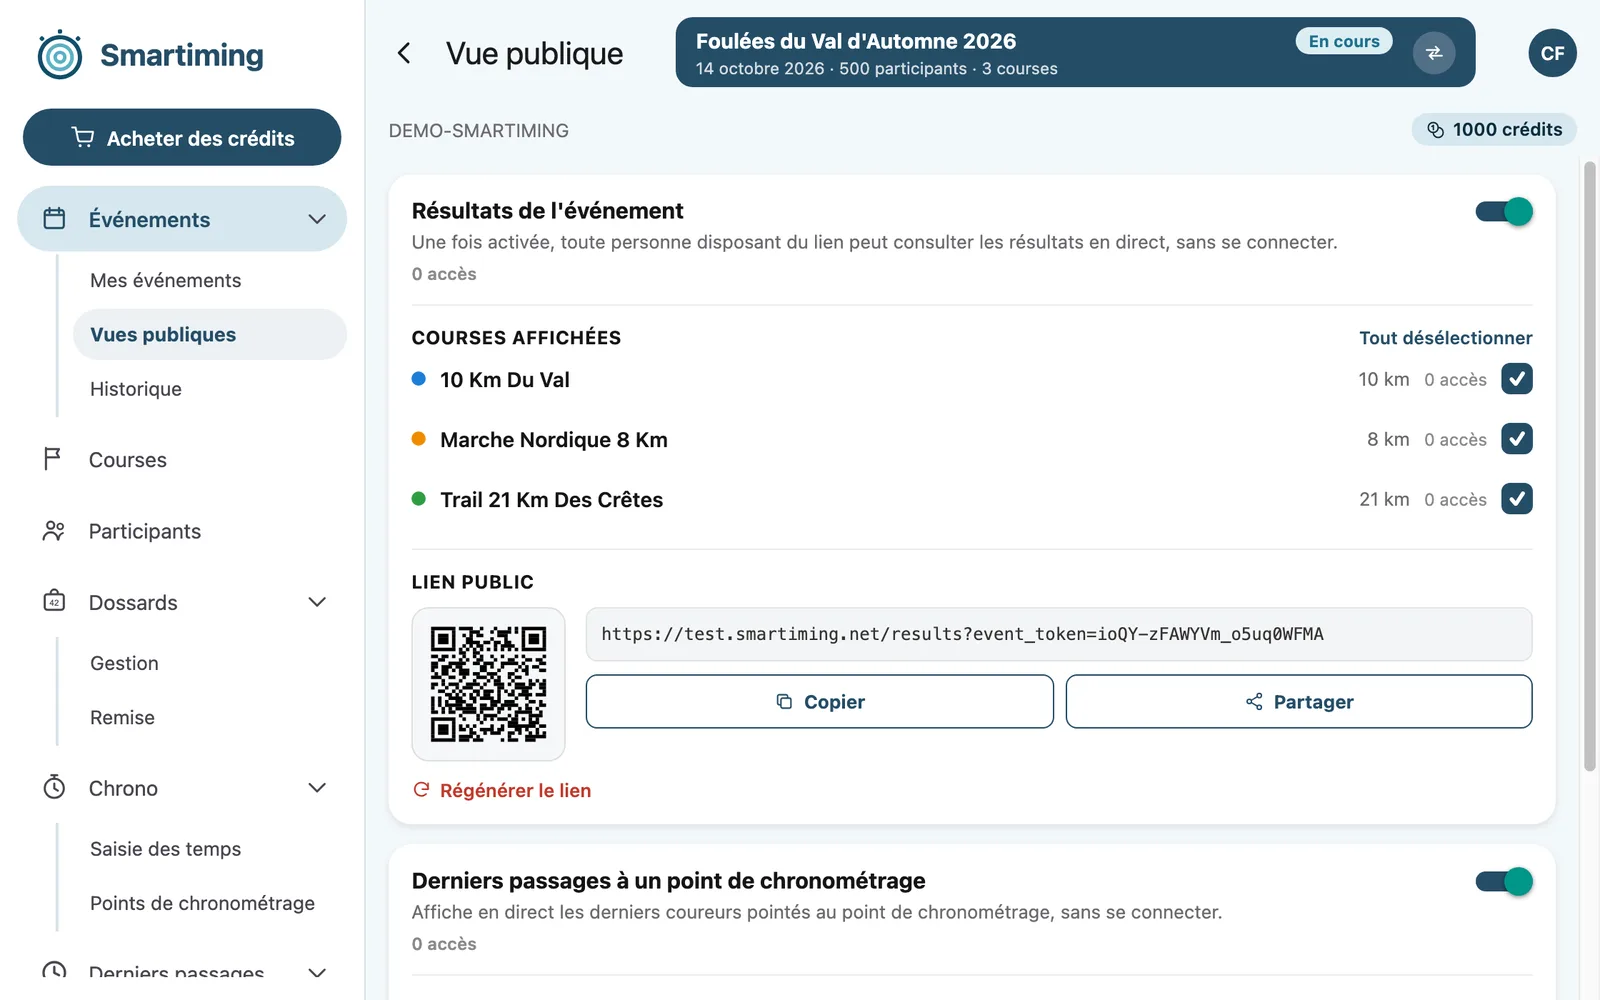
On your event's card, open the Public view (the globe icon) and turn on “Event results”. The public page is off by default.

Then share the link or display the QR code: every runner finds their result on their phone, with no account and no app.

Turning on the public results page and its QR code

In short

WhenWhatWhere
BeforeCreate the account, the event and the racessmartiming.net → Events → Races
Register participants (one at a time or from Excel)Participants
Assign the bibsBibs → Manage
Race dayHand out the bibs (optional)“Bibs” status → Bibs → Handout
Start the race“In progress” status
Record the finishesTiming → Time entry
Close the race and settle the missing runners“Finished” status
AfterCheck, export and share the resultsResults → Export · Public view

Ready for your first race?

Create your account: free credits are waiting for you to try Smartiming on your event. A question? Write to us from the Contact page.

Create my free account